Adding watermarks to photos.
Panel for adding watermarks to photos. You can use text or an image file as a watermark. The panel can change the size of the finished photo, add sharpness, or perform your operation after inserting a watermark. Batch mode for adding watermark to multiple photos.
Panel work
The panel allows you to automate the process of adding watermarks to photos.
On the "sign selection" tab, you can choose the type of sign-the text you enter or the image you upload:
On the "sign selection" tab, you can choose the type of sign-the text you enter or the image you upload:

When selecting text, enter the text for the sign, select the font from the lost, and select the color for the sign text.
When you select an image, a file with an image is selected
In tab " the placement of the sign" are the main parameters for the location of the sign in document:
When you select an image, a file with an image is selected
In tab " the placement of the sign" are the main parameters for the location of the sign in document:
The position of the sign is selected from 9 zones from the upper-left to lower-right corner of the document.
Sign size - the value as a percentage of the document size, the size is calculated so that photos of the same size but different orientations (book or landscape) will have the same sign size.
Rotation of the watermark in degrees: left - counterclockwise, right - clockwise.
Indentation from the borders of the document:
The example shows placements of characters in corners with the same positive margins. In the center line, a positive vertical indent moves the sign down. In the center column, a positive horizontal indent moves the sign to the right.
Watermark transparency - adjust transparency in percent.
Tab "Resizing, Sharpness, Operations" :
Watermark transparency - adjust transparency in percent.
Tab "Resizing, Sharpness, Operations" :


Resize - if checked, the document is resized after watermarking, the size in pixels is selected along the long or short side of the document, indicates the resolution of the document in pixels per inch.
Add sharpness - if checked, the "Contour sharpness" filter is performed, the parameters of which are configured in the fields: exposure, radius, and cutoff. The option is available with the selected JPG export format.
Perform an operation - when checked, any operation from the set of operations with the name "Watermark" is selected, if there is no such choice, then you need to create it and drag any operations into it or write new ones. The selected operation is performed by inserting a character into the document.
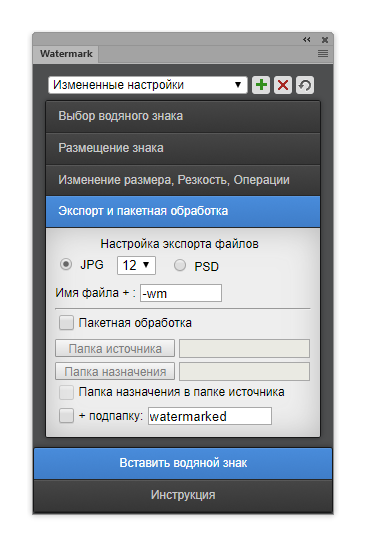
Tab " Export and Batch Processing "
Add sharpness - if checked, the "Contour sharpness" filter is performed, the parameters of which are configured in the fields: exposure, radius, and cutoff. The option is available with the selected JPG export format.
Perform an operation - when checked, any operation from the set of operations with the name "Watermark" is selected, if there is no such choice, then you need to create it and drag any operations into it or write new ones. The selected operation is performed by inserting a character into the document.
Tab " Export and Batch Processing "
Selecting the file export format - JPG or PSD. When you select PSD, the layers are saved in the document. "File name +" to save the file name, you can add the ending in this example "-wm".
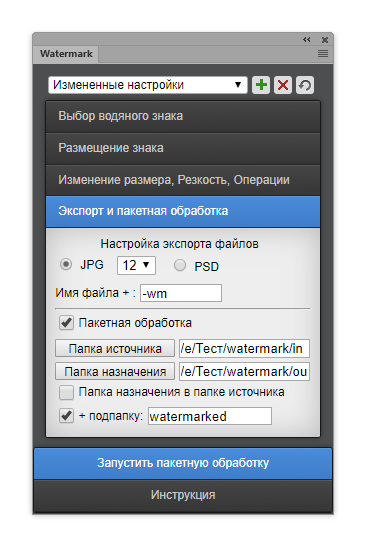
Batch processing when this mode is selected, the program will put a mark on all files located in the source folder, after marking and applying all the selected options, the finished files will be saved in the destination folder.
With option selected "Destination folder in source folder" finished files will be saved to the source folder.
with option selected "+ subfolder" in destination folder a subfolder with the given name will be created, ready files with marked signs will be saved in this folder.
With option selected «Batch Processing» button" Insert Watermark" changes to "Start batch processing "when clicked, the processing process will be launched.
If option "Batch processing" is not selected, after setting and clicking on the "Insert watermark" button, the process of inserting the mark into the document starts, button "Insert watermark" change the name to "Save JPG" or "Save PSD", depending on export setting, after clicking on the button, the finished file will be saved in JPG or PSD format. If the character is inserted and you do not need to save, change the button to "Insert watermark" you can click on the "Update Panel" button in the upper right corner of the panel.
All settings are saved in the panel after restarting Photoshop. Settings can be saved to files using the button" Add a new set of settings"- green plus in the upper right corner of the panel, if necessary, the settings can be deleted using the "Delete settings set" button - red minus in the upper right corner of the panel.
If during manipulations with the settings, adding, deleting, selecting, the necessary settings did not appear, or did not appear correctly, click the reload panel button.